Friday, June 28, 2019

Sew a Small Wallet Tutorial

Sew a Small Wallet Tutorial

by Karla Fidoe (owner and maker of Pop of Color Bags)


Can you cut a rectangle? Sew a pillow? Sew a straight line? Then this scrap busting small wallet tutorial is for you! This project is perfect for a beginner who is ready to branch out into something that looks complicated, but is no harder than sewing shut a rectangle (don't worry, we'll let everyone who sees your wallet keep thinking how complicated it looks!) 
**Apparently I am a better maker than a blogger because I can't figure out how to get the numbers on the side to go away. Please ignore the random floating numbers! Smh! 😖

Materials:

  • Choose your fabrics - pick one fabric for the exterior/base (I like to use an outdoor fabric as it is more durable for the outside). This one needs to be cut into 2 rectangles measuring 5 by 9 1/2 inches. 
  • Choose a coordinating fabric for a pocket. This one will measure 5 by 9 inches. 
  • Choose another coordinating fabric for a second pocket. This one will measure 5 by 8 inches.
  • Choose your last fabric for the inside of the zipper pocket - this one will measure 5 by 9 1/2 inches.
  • 8 inch zipper
  • Kam Snap
  • Coordinating Thread
  • 4 by 8 1/2 inch interface (I use Pellon Craft Fuse fusible interfacing)
Steps:
Step 1. Prepare base fabric by cutting your rectangle into two. Measure 4 1/2 inches up from the bottom and cut. This is where the zipper will be sewn.

  1. Step 2. Prepare your pockets by folding wrong sides together, ironing a crease, and top stitching a line across the top of both pockets.
  2. Step 3. Prepare your exterior fabric by ironing on the interfacing.
  3. Step 4. Sew the bottom of the base fabric to the zipper. (I don't use a zipper foot, instead, I position the needle as far left as it will go and leave the zipper zipped so the pull is out of the way). Place your zipper face down on the right side of the base fabric. Line up the pocket fabric facing down on the top of your zipper. Sew a straight line with your foot almost touching the zipper teeth - using your guiding hand to feel the raised line of the teeth to help you stay near them.


  4. Step 5. Iron your seams and top stitch. Don't forget to switch your needle position back to center!

    Step 6. Sew the top of the zipper by repeating step 4. (Make sure your base fabric edges are lined up on each side, and the direction of the fabric is correct).
Step 7. Repeat step 5 to top stitch for the top of the zipper.

Step 8. Congratulations! You made it past the zipper, and now it is smooth sailing! Simply pin your 2 pockets in place underneath the zipper.


Step 9 & 10.  Open your zipper 3/4 of the way.Place your exterior fabric face down on the base fabric. Right sides will be together. Start on the left side, near the top corner, and sew around the outer edge. Stop sewing just past the zipper on the left side - this leaves enough room for you to turn your wallet right side out. Because all of your pockets, including the interior zip pocket, measure the same width as the exterior, you will automatically sew all of these seams.


Last Steps:
11. Once you have turned your wallet right side out, top stitch the entire perimeter of the rectangle. When you get to your opening, simply use your fingers to tuck the edges inside and top stitch to close the opening. You can also add a ribbon tag with a key ring before you close the opening.

12. Add your snaps and you are finished! Now it's time to take your wallet shopping so you can enjoy the ensuing compliments on your new sewing project!


Don't want to make your own? Check out a few I've made at my #etsyshop!

Tuesday, June 25, 2019

Not your usual Tote Bag

Three Steps to Create a Compliment Worth Tote Bag

by Karla Fidoe (owner and maker of Pop of Color Bags)
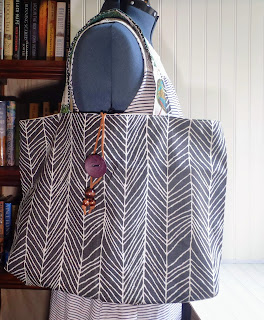
Scroll through Pinterest, walk around a department store,  or go out in public anywhere and you'll see tote bags being carried by most women.  We carry a tote because of the convenience. The open mouth makes it easy to grab your wallet or keys.  The size means you don't have to edit what you carry.  The shape is flattering for all body types.

I carry a tote bag half of the time. However, it is not a bag you get compliments on. I want to change that! I want a tote bag with personality and style.

The struggle I have is to create an adult tote bag that isn't boring, but still has that sophisticated feel. Enter step one. Choose a base fabric which has a rich texture or basic geometric pattern.

Step two. Think about colors you typically wear. (A purse is a lot like jewelry, if it matches, it brings together the whole look.) Choose a pop of color fabric which showcases your personality and style.

Step three. What can you add to the tote that makes it extra? It could be a trim, a pocket placement, or an embellishment like a tassel.

When following these 3 steps, you can build a tote bag that stands out in a crowd. Happy sewing!

Saturday, June 15, 2019

Beautiful and Functional: Vertical Pockets to Modernize Wristlet Clutch

A Perfect Wristlet Clutch

by Karla Fidoe (Pop of Color Bags)


I've come to think of a purse as jewelry. It adds to an outfit, and can even become a statement piece. Carrying the perfect purse brings my outfit together, and makes me feel like I have it together. Never mind that I realize I only put in one earring and my socks don't match... I know my wristlet clutch is perfect and is sure to draw compliments.

What makes this bag so magical? I've been sewing pockets on the outside of my bags for years. It doesn't matter if it's an over-sized tote or a small clutch, having a pocket
for my phone is more convenient than opening a bag or rooting around in the bottom to find that pesky phone. With a wristlet, most people sew a horizontal pocket and use a magnetic clasp for securing items inside the pocket. Why?

Vertical Pockets up the Ante on Function for a Wristlet Clutch

When you carry a wristlet, you place the strap around your wrist and it dangles vertically. Your horizontal pocket is now open on the side. I end up spending a lot of time checking to make sure my phone hasn't slipped out. Sewing a diagonal pocket means when I'm carrying my wristlet, my phone is vertical and can't slip out. Such a simple change makes a huge, functional impact! Find your perfect wristlet at my #etsyshop Pop of Color Bags.

Tuesday, June 11, 2019

Bow Hand Strap Clutch Tutorial

Bow Hand Strap Clutch Tutorial

by Karla Fidoe (owner and maker of Pop of Color Bags)


I hate to watch videos or print out patterns. Let's be honest, most sewing patterns for handbags start with a rectangle and build from there. If you can sew a zipper, you can build almost any bag through trial and error. This tutorial is meant for those of you who are comfortable sewing a zipper pouch and are looking to branch out from there into other design aspects.

Materials:
* (cut 2) 11 x 8 inch rectangles for exterior (I used cork fabric for the base of my wristlet clutch)
* (cut 2) 11 x 8 inch rectangles for interior (I prefer to use cotton on the interior)
* (cut 2) 13 x 10 inch rectangles for bow hand strap (a sturdier fabric like outdoor fabric or canvas works best)
* 12 inch zipper
* d-ring
* lobster claw
* 1 x 3 inch rectangle of exterior fabric (for center of bow)
* (cut 2) 2 x 4 inch rectangle of interior fabric (for ends of zipper)
** depends on size of your d-ring and lobster claw, but you'll need to cut a tab and wrist strap

Steps:
1. Attach the zipper to the outside and inside fabrics on both sides.


2. Sew the bow fabrics down the top and bottom sides, right sides together. 
3. Turn bow right side out and iron the seams flat.

4. Sew cork, right sides together, at ends to make a circle.
5. Turn cork fabric circle rights side out.
6. Accordion fold the bow so you can slip on the cork fabric ring.

7. Once the ring is in the middle of the bow, fluff out the ends to make the bow, rather than have accordion pleats.


8. Use wonder clips to pin the bow onto the front of the zipper pouch. Line up the top peaks of the bow with your top stitch seam line.

9. Sew a baste stitch along each side of the bow to keep it in place when you construct the wristlet.


10. Sew the wristlet as you normally would a zipper pouch. Make sure to add your d-ring for the wrist strap.  *When you pull everything through to make the bag right side out, it will look frumpy. Notice the d-ring is tucked under the bow?

11. The bow is on the wrong side of the bag! Simply pull it through the bottom of the bag to re-situate it on the correct side.

12. Your bag is finished! Notice the d-ring is now visible, and the bow lays flat. The back is also flat.

Sunday, June 9, 2019

Summer Bags 2019

Summer Bags Trends

by Karla Fidoe (owner and maker of Pop of Color Bags)

The latest trends are bold prints, lots of palm fronds, pops of color, and cork wristlets. This Bow Hand Strap Clutch has it all! The cork fabric is fun to work with - no frays, no sticking under the zipper foot, and it isn't too thick in the seams. The bow is made out of outdoor fabric - for the sturdiness, it's water resistant, and retains its color well.

I love the ease and uniqueness of a hand strap clutch. For summer, I modified my design to have a bow hand strap. This clutch wristlet is fun, eye catching, and screams summertime!

Come find your perfect summer bag on trend at my #etsyshop, Pop of Color Bags.

Thursday, June 6, 2019

Perfect Purse

The Perfect Purse to Sew

by Karla Fidoe (owner and maker of Pop of Color Bags)

I hate to ruin the idea of a perfect purse, but the perfect purse is actually TWO bags. What? I know you are asking yourself I how I figure a perfect bag is actually carrying two purses. 

Here is my argument: Every woman has a tote bag for those days you need to juggle 13,000 things to get you through your day. You need your lunch, a few items you plan to return to a store, makeup bag for touch-ups before you meet the gang for dinner, etc. 
But, when you meet the gang for dinner, do you want to be hauling around your whole life with you? No! Hence the need for a second bag. A wristlet clutch is a perfect companion. It's small enough, and weighs very little, to toss into a tote bag. When you get to where you're going, you just pull it out of the tote, and look like you have life in hand!
Need another argument to support my claims? You can give yourself permission to buy both bags you love instead of one!

Find your perfect bags at my #etsyshop Pop of Color Bags.

Monday, June 3, 2019

Scrap Fabric Ideas

Use Your Scrap Fabric to Create Appliques

by Karla Fidoe (owner of Pop of Color Bags)

 I came across the idea of sewing the strips together to create a new fabric.     
I'm not sure if it is the teacher in me or the sewer, but I horde every piece of fabric! I keep a bin underneath my cutting table for pieces that are too small to reuse - or so I thought. 


I then cut out shapes I wanted and topstiched the created fabric a million times.
I finished each shape with a zigzag stitch, going around at least twice.             
In between making bags, I decided to tackle my overflowing bin and searched Pinterest for ideas.

Once I started with the leaves, I knew they would make a cute addition to a cork wristlet bag. However, I'm not sure how easily they are to apply, and how well they hold up. So, I created a Beagle for myself as a test for how durable the applique will be, as well as test out using a zigzag stitch to apply the applique.

I love being the tester for all of my new creations! Check out my other creations at Pop of Color Bags.
I used flannel for the ears and tip of tail to add texture. I even used fabric scraps to wrap a metal ring for the handle.