Sunday, December 29, 2019

Lessons Learned in my First Year on Etsy

Lessons Learned in my First Year on Etsy

by Karla Fidoe (owner and maker of Pop of Color Bags)


I opened my Etsy shop, Pop of Color Bags, on February 19, 2019. Let me start off by saying, I'm not a millionaire or getting to retire early because my shop was a wild success. I am a full time elementary school teacher. I opened my shop at the encouragement of my friends and my third graders. I was doing a month of morning meetings on the topic of following your dreams. All kids believe if you want something, it magically happens. I was trying to teach them that once you know your dream, you take steps to achieve it - they may be tiny steps, but each day you do a little more until you realize your dream. And then it hit me, I wanted to have a reason to sew more - I wanted to have the confidence to sell my handbags online. So, I opened my shop.


That first day was a little like losing your virginity. You feel like you have had this major life event, and you keep checking in the mirror to see if other people will notice the monumental change. Opening the shop was anti-climatic. It's not like you start hearing the cha-ching chime as soon as your shop is live. 

And then I made my first sale in that first week. I realized I had not thought about how I would print the shipping labels, or where I would drop off the package - and immediately panicked. Here's lesson number 1: Before panicking, read the Etsy help articles. They really do walk you through every situation. 

Lesson number 2: Join an Etsy Facebook group. Be careful, they are extremely useful for posting questions or asking for shop critiques, but don't get sucked into the complaining, sob stories about shops getting closed, or competing with other shops (some people post their stats regularly). I use the Facebook group to help me understand changes Etsy occasionally makes, and to ask random questions. The community is great at answering and allaying fears, giving advice, and sharing perspectives you may not have considered when it comes to understanding Etsy.

Lesson number 3: Once I had more than 50 items in my shop, I started getting more views generated by Etsy. I did research my tags (ETSY SEO), updated my Etsy shop at least once a day, and used Canva to create Pinterest graphics. But, in the end, having more items gave me the biggest boost in views, and I started getting spotted on the first couple of page views for wristlet clutches, instead of being on page 100. 

Lesson number 4: Create a blog. I know, this is the hardest step, but makes the most difference in the views you receive from Pinterest. I went from 10 monthly view to 23k monthly views in the space of 10 months, and all because I started blogging. Sure, graphics are great on Pinterest, but having tutorials and commentary (just like I would click on when I am researching ideas) means you get more interest. You are more likely to be re-pinned. I have almost 28,000 impressions on just 2 of my blog posts, and that is just in the last 90 days.

Lesson number 5: Do it your way. There's a lot of talk about "branding," but if you stay true to your vision, and what you love, you'll have an automatic brand. All of my purses go together. Every single one has a sense of my style and attention to details. If I just researched other shops, and tried to recreate their successes, I would lose my voice. By doing what I love, my brand shows through loud and clear.

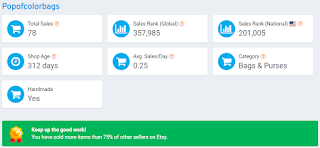
I feel like I had a great first year, and am happy I took the plunge. In the next year, I am challenging myself to do better, and to continue tweaking my shop. My photographs could always be better, I should blog more, I should think about variations instead of just having one of a kind items. But for now, in this last week of 2019, I'm going to marvel at the fact I sold purses to 14 different states, made 78 sales, and was able to do this by sewing what I love.

Happy Sewing!
Karla 

Thursday, December 26, 2019

Creative Additions to Zipper Wristlets

Creative Additions to Zipper Wristlets

by Karla Fidoe (owner and maker of Pop of Color Bags)


Can you sew a zipper pouch? (If not, check out my tutorial). Then you are ready to start making wristlet clutches! I love being able to make my own purses, and there are endless options to customizing your own purse when you know how to sew a zipper pouch.

I got into making my own purses because I hated working with patterns - the trace paper pieces, the millions of steps, not to mention refolding those trace paper pieces! I love that a wristlet is just different sizes of a rectangle. By adding layers on top of the rectangle shape of the zipper pouch, I can change the function and feel of the handbag. I taught myself to sew zippers, so if I can do this, any one can!

Here are some ideas for additions to your zipper pouch:
Cork Wristlet with pleated plaid pocket
*Simply add a pleated rectangular piece of fabric to one side of your cork before sewing the zipper.

Cork Wristlet with diagonal front phone pocket
*Cutting off one corner of a rectangle allows you to have the diagonal pocket. Attach the pocket to your cork before sewing the zipper.

Boho Wristlet Clutch
*Combining fabrics and adding a tassel detail gives a boho look to your zipper wristlet.
Suede and Cotton Wristlet
*Taking a cotton rectangle, add triangles of another textured fabric in the corners to create a rich feeling wristlet clutch.
Hand Strap Clutch Wristlet
*Using a slimmer rectangle, you can create a hand strap. Simply baste it to your cork fabric before sewing the left and right outside seams.

Bow Hand Strap Clutch
*Pinching the center of a rectangle creates a bow. Want to make it? Check out my tutorial here.

Each of these handbags starts with cutting out a rectangle for a zipper pouch. Adding the extra details allows you to create a style or customize it. I'd love to see what you come up with - feel free to snap a pic and post in the comment section.

Happy Sewing!
Karla


Sunday, December 22, 2019

Eco-Friendly Purses

Eco-Friendly Purses

by Karla Fidoe (owner and maker of Pop of Color Bags)

I didn't set out to sew eco-friendly purses. I sew because I love taking a fabric, combining prints and textures, and making something beautiful. Every piece of fabric tells a story, and I am lucky enough to be the narrator. 

The richest textures just happen to come from eco-friendly resources. Cork fabric is durable, has a buttery soft feel, and adds structure to a purse. Cotton can come in an endless variety of prints and colors, and adds a luxurious feel to a bag. With these two fabrics, I can tell a beautiful story.


A cotton canvas fabric can be combined with cotton rope handles to create an everyday market bag. *Side note: I created this bag and was worried about the cotton rope handles in button holes. So I tested it out by carrying it for a week. I toted my laptop, glass lunch dish, and a cork wristlet most days. The button holes haven't stretched, and the rope handles add a fun detail. After a week, I made a few more,  but have continued to carry mine, as it has become my favorite everyday market bag! It matches my cork wristlet, and gives a boho feel that compliments my style.
Creating eco-friendly bags wasn't my original mission, but has become my preferred fabric choices for sewing. The richness of the fabrics make beautiful bags.

Happy Shopping!
Karla

Sunday, December 1, 2019

What are you looking for in a purse?

What are you looking for in a purse?

by Karla Fidoe (owner and maker of Pop of Color Bags)


I've said many times that what draws me to sewing purses is the fact that a purse always fits. Before I started making my own, I would spend hours searching for that perfect purse. 

Cork Wristlet Clutch with Phone Pocket
I would try them on in department stores and walk around to see if it was going to be "the one." So many purses slip off my shoulders, or are too bulky and make my arm float. Then there's the ones with a thousand pockets, which seem like a good idea, but in reality, means you can't remember which pocket holds your keys and spend forever searching for what you need. Of course, there is also always the surprising heavy empty purse which is sure to make my neck hurt once I start adding my own belongings.

To me, a purse is like jewelry. It completes an outfit with that last bit of detail. It can take a mundane, running errands outfit, to a completed, "I've got this," feeling that boosts confidence and makes sure you are ready to face your day.
Bow Tie Clutch Wristlet
Woven Wristlet Clutch

Wristlet Clutch with Bold Print
So what kind of purse has these magical qualities? My answer, a simple wristlet clutch. Cost effective enough so you can have multiple clutches, this modern handbag allows you to complete an outfit, easily change purses, and throw it inside a tote when you need more space. With multiple styles, it is easy to find a wristlet which shows your identity.


What are you looking for in a purse? Share your comments with me!

See a style you like? Check out my Etsy shop, Pop of Color Bags.
Happy Shopping! Karla


Sunday, November 24, 2019

A Boho Fall Collection

Boho Fall Collection

by Karla Fidoe (owner and maker of Pop of Color Bags)

In my head, Boho style is a mix of the 60s hippie fashion with an eclectic twist. Choosing Boho clothes results in a modern wardrobe that is whimsical, has geometrical elements, and looks effortless. I love being able to mix and match prints, add decorative elements, and pair textures. 


Sunday, October 20, 2019

A Perfect Custom Gift

A Perfect Custom Gift

by Karla Fidoe (owner and maker of Pop of Color Bags)


Searching for Secret Santa gifts? White elephant? Christmas gifts for co-workers or friends? #shopsmall #shophandmade with a zipper pouch. Sounds simple, but a zipper pouch has many uses and many styles. 
Use as a coin purse 

Use as a pencil pouch

Use a zipper pouch as a makeup bag

Use a jewelry pouch

A zipper pouch can be a first aid kit, a coin purse, a gift card holder, a beauty kit, anything you can think of and much more useful. I know I carry a zipper pouch in my purse to help corral small items and make switching bags easier. I have them in my bathroom, on my vanity, in my car, pretty much everywhere! 

Choose one that shows your gift receivers style and fill it with thoughtfully for a perfect gift.

Happy Giving!
Karla Fidoe

Leave a comment to share how you gifted your zipper pouch🎁


Sunday, October 6, 2019

How to Sew Shoulder Bag

Step by Step Tutorial for Sewing a Shoulder Bag 

by Karla Fidoe (owner and maker of Pop of Color Bags)


I love to carry and sew a wristlet clutch or tote bag. I've made hundreds of each style of purse, and my customers frequently ask for a happy middle ground - a shoulder bag. For some reason, my shoulder bags end up looking more like a tote bag in size than a shoulder purse, so I've been experimenting with dimensions and a new pattern to create the perfect shoulder bag.

Materials:
4 -  13" x 15" rectangles (I like to use coordinating fabric, 2 rectangles for the exterior and 2 rectangles for the interior fabric.
2 - 1" d-rings
2 - 4" by 3" fabric rectangles for the d-rings
2 - 1" lobster claw rings for purse handle
1 - 20" by 3" wide rectangle for fabric handle


Steps:


1. Cut out fabric rectangles. I like to use a plate to add an armhole curve. Simply fold your 4 fabric rectangles in half, and use your rotary cutter to trace around the plate at the desired curve depth.
When you open the fabric, you'll see a bump where the curves meet. Simply use fabric scissors to even it out.
After you even out your curve, it should look like this.

2. To have boxed corners, simply cut a 1" by 1" square
out of the bottom corners of your fabric rectangles.

3. With right sides together, sew seams along the exterior fabric on the wrong side.

4. Box the corners by aligning your side and bottom
seams in the 1" by 1" cutouts in the corners.


5. Fold and iron your d-ring attachment pieces.
(I chose to use cork fabric since I don't need to finish the edges.)

6. Fold and iron your handle. Sew a straight seam along
one edge. (I chose to cut a 16" long rectangle so I could
use cork to accent the ends of the handle.)
7. Add a slip pocket by sewing a rectangle and
placing it on the right side of the interior fabric.

8. Sew side and bottom seams of your interior fabric.
Make sure to leave 4" along the bottom edge to turn your bag.
Box the corners before you turn the fabric right side out.
12. Turn interior of the bag right side out. Place it inside
of the exterior bag so that right sides are together. Pin the
d-ring handle attachment to the sides with the d-ring
hanging down inside the sandwiched bags.
13. Sew the bottom hole in the interior bag closed by simply folding unfinished edges
in and sewing a straight seam to close.

14.  Top stitch along the edge of the purse.
Attach your purse handle and you're finished!

Happy Sewing!
Karla

Tried this yourself? Leave a photo of your purse!
Like the look and want to buy it? Go to Pop of Color Bags.

Friday, September 20, 2019

Animal Print Collection

Animal Print Purses and Bags Collection

by Karla Fidoe (owner and maker of Pop of Color Bags)

Animal prints are such a fun neutral trend! I scoffed at the new trend the first time I saw a cheetah print top at J Crew's. The second time I was shopping and saw a dress with the print, I tried it on for fun. And realized it is super fun! It's hard not to feel spunky dressed in animal print - I dare you to try.

When I ran across fabric at Joann's in animal print, I knew I had to try to make a bag. Some of the prints are more geometric, some are neutral in color, but there is something for everyone.

Eclectic Envelope Clutch Wristlet

Mixed Patterns and Prints Wristlet Clutch

Envelope Clutch with Hand Strap in Zebra Print
Animal Print Hand Strap Clutch
Happy Shopping!


Saturday, August 24, 2019

Sew a zipper without using a zipper foot

Sew a Zipper without Using a Zipper Foot

by Karla Fidoe (owner and maker of Pop of Color Bags)


Sewing a zipper is one of those tasks that seems incredibly hard, and like it would take a high level of skill. In reality, if you can sew a straight seam, you can sew a zipper!

Step One
Cut two rectangles measuring 1.5 inches wide by 3 inches tall. These will become the end zipper tabs to ensure you have perfect corners.

Step Two
Fold each end of the rectangle down, fabric is right side down, and iron.

Step Three
Fold your rectangles one more time, in half. Iron. You are now ready to sew the tabs to the end of the zipper.

Step Four
Instead of switching to a zipper foot, use your regular sewing foot. (I find it gives me more control, and has a better guide for me to use for sewing a straight line.) Change your needle position to 0 (this position should be closest to the left inside edge of your sewing foot).
Sew each tab to the each end of the zipper.


Step Five
Lay your zipper face down on the top edge of your exterior fabric with the right side facing the zipper teeth and the zipper pull farthest from the side you plan to start sewing. Center it. (You can pin, but I find it just as easy to hold with my fingers and adjust as necessary.)


Step Six
Line up your interior fabric, right side down, on top of the zipper and exterior fabric. You know have a zipper sandwich.

Step Seven
With needle still in the 0 position, sew a straight line across the top of your zipper sandwich. I find it helpful to use my left hand to keep track of the bump caused by the zipper teeth so my fabric doesn't shift during sewing. Stop when you near the zipper pull.

Step Eight
Lift your sewing foot, reach between your fabric sandwich, and unzip the zipper far enough so the zipper pull won't be in your way. Put your foot back down and continue sewing until you reach the end.

Step Nine
Open the fabrics you have just sewn so that the fabrics are wrong sides together. Iron your new seam.

Step 10
Top stitch by moving your needle position to 1 (or back to the middle of the foot). I like to use the top fold as my guide to ensure I sew a straight line. Top stitching is an important step (and an easy one to forget!) to make sure the fabric never gets caught in your zipper teeth.

Congratulations! You have completed one side of your zipper. Repeat steps four through ten to complete your first zipper.

If you have any questions, please feel free to leave them in the comment section. If you'd like to see more of my sewing tips, follow me on Pinterest or check out my Etsy shop, Pop of Color Bags.
Happy Sewing!
Karla